Electrical Rough In - The Basics
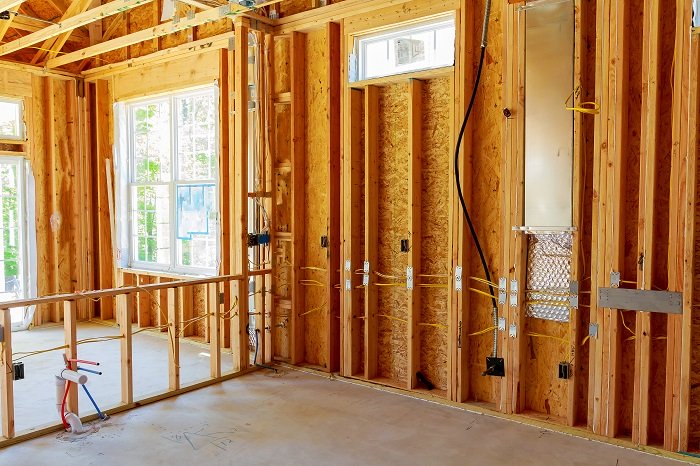
Electrical rough in has been achieved when all electrical cables and wires have been pulled through the wall studs or other portions of the framing and are inserted into the wall and ceiling boxes. This phase will usually be inspected before the drywall goes up to make sure it has been installed correctly. The later phase will be when the light switches, outlets, lights and other devices are attached.
What an Inspector May Review During the Electrical Rough In Phase
Most cities or counties will have an inspector come to your new build to make sure items are installed correctly and safely. Even if this is not the case for you, here are some electrical rough in basics to review.
Proper circuits: Your inspector will check to make sure that the home or addition has the proper number of circuits for the electrical demand of the space. This will include making sure there are dedicated circuits for appliances that call for them. Especially in kitchens, it is critical that there be a dedicated circuit that serves each appliance that requires one, such as the microwave oven, garbage disposer, and dishwasher. The inspector will also make sure there is the appropriate number of general lighting and general appliance circuits for each room.
GFCI and AFCI circuit protection: GFCI circuit protection has been required for some time for any outlets or appliances located in outdoor locations, below grade, or near sources of water, such as sinks. Kitchen small-appliance outlets, for example, require GFCI protection. The inspector will check to make sure that the installation includes GFCI-protected outlets or circuit breakers where the code requires it. A somewhat newer requirement is that most electrical circuits in a home now require AFCI (arc-fault circuit interrupters). The inspector will also check to make sure that this protection follows code requirements—either through the use of AFCI circuit breakers or outlet receptacles. While existing installations do not require updates, AFCI protection must be included on any new or remodeled electrical installation.
Electrical boxes: Inspectors will check to see that all electrical boxes are flush with the wall and that they are large enough to accommodate the number of wire conductors they will contain, along with whatever devices will be contained. The box should be securely fastened so the device and box are secure. Homeowners doing their own work are well-advised to use large, spacious electrical boxes; not only does this ensure you'll pass inspection, but it makes it easier to complete the wires connections.
Box heights: Inspectors measure outlet and switch heights to see that they are consistent. Typically, outlets (more correctly called receptacles) should be at least 12 inches above the floor and switches should be at least 48 inches above the floor. This, of course, is subject to certain allowances. For a child's room or a handicap installation, heights may be much lower to allow for access.
Cables and wires: Inspectors will review how the cables are clamped in the boxes. At the point of attachment of the cable to the box, the cable sheathing should stick into the box at least 1/4 inch so that the cable clamps grip the sheathing of the cable, not the conducting wires themselves. There should be at least 8 inches of usable wire length extending from the box. This allows enough wire to connect to the device and allow future trimming to connect to replacement devices. The inspector will also ensure that the wire gauge is appropriate to the amperage of the circuit—14-gauge wire for 15-amp circuits, 12-gauge wire for 20-amp circuits, etc.
Cable anchoring: Inspectors will check for proper cable anchoring. The cables should be attached to wall studs to secure them. Keep the first staple no father than 8 inches from a box and then at least every 4 feet thereafter. Cables should be run through the center of wall studs to help keep the wires safe from penetration from drywall screws and nails. The horizontal runs should be at least 20 to 24 inches above the floor and each wall stud penetration should be protected by a metal protective plate. This plate keeps screw and nails from hitting the wire within the walls when the drywall is installed.
Wire labeling: Although not required by code, some electricians and savvy homeowners label the wires the electrical boxes to indicate the circuit number and the amperage of the circuit. An inspector is greatly reassured when he or she sees this kind of detail in a wiring installation.
Surge protection: If you have delicate electronic devices such as TVs, stereos, sound systems, and other such equipment, the inspector may recommend using isolated ground receptacles. This type of receptacle protects against current fluctuations and interference. Along with isolated receptacles, surge protectors, either individual or whole house protectors, will protect these sensitive electronic devices. When planning for surges, don't forget the electronic boards in your washer, dryer, range, refrigerator, and other sensitive appliances.
Short Video Showing
Electrical Rough In Process
Tips from the Pro's
Visit Construction Pro Tips page to find a great tutorial on electrical rough in tips. Here is a list of the tips they cover, but you will want to visit them because they have pictures to illustrate their points.
- Which Box Works Best
- Special Cable Staples
- Auger Nits and Angle Drills Work Best
- Install Plates Before Pulling Wire
- Drill Straight, Aligned Holes
- Pull Rolled Cable from the Middle
- Avoid Exposed Open Spaces
- Straighten Wires Before Pulling
- Don't Over-bend Cables
- Mark Box Locations
- Ceiling Fans Need Special Boxes
- Strip Off the Sheathing
- Angle Into Corners

Bridge the Gap

Understanding your vision for a dream home is key. At Home Builder Assist and HBA Construction, we're dedicated to making that vision a reality by combining your ideas with our expertise to achieve your goal.
Right for me?

Determining if a program is suitable for you involves assessing your goals, needs, and interests against the program's offerings, structure, and outcomes. Here are some questions to ask yourself first.
|
|
Construction Consultant DANA PALMER Office (830) 507-5956 FREQUENTLY ASKED QUESTIONS * EVENTS * BUILDING TERMS
|